
This is a simple Projection Mapping tutorial for beginners. You will use a Processing sketch to map your face (or an image file face) onto a mannequin face. The Processing sketch will record your face through your webcam or will read an image file from your disk; its output is then passed via Spout (Syphon) to the mapping software MAPIO, and then you will use MAPIO warping features to map your face onto a mannequin face using a projector.. or without it 🙂 Most of the images in this tutorial are from Windows, but the workflow for Mac users is almost the same, so you can follow it without problems.
MAPIO is a simple yet powerful Projection mapping software, that I found to be very useful especially for beginners, just to get a feel with the basic principles of projection mapping.
Spout (on Windows) and Syphon (os OSX) are two useful utilities that allows applications to share frames, video or stills, in realtime. Using these utilities, you can gather two or more video source from different software and mix, merge, edit the result using another software.

Download the software
- Download & install Processing (processing.org)
- Download & Install MAPIO2 LITE (visution.com)
- Windows users: download & Install Spout (spout.zeal.com)
Install Video, Spout / Syphon Libraries for Processing
- In order to use our webcam with Processing, we need to install the correct library. To do so, go to: Sketch -> Import a library -> AddLibrary… (you can do this even if you don’t have a webcam)
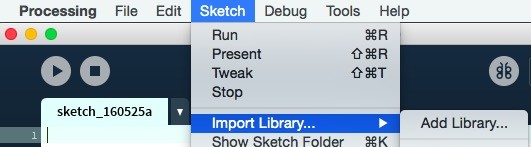
and type in the Video in the ‘Find’ field. Click on the Video library from Processing foundation:
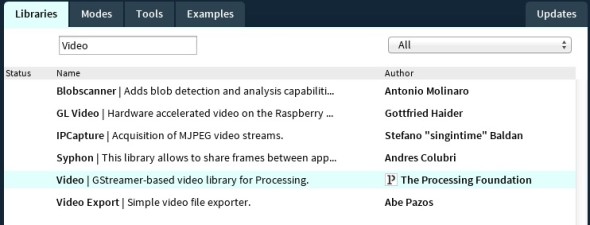
Click ‘Install’ button and wait for the download. If the installation will success, you should see a green circle at the beginning of the row. - Windows Users: just repeat step 1, but this time installing Spout library.

- OSX Users: just repeat step 1, but this time installing Syphon library.

Run the Processing sketch
- Download here (WIN / OSX) the Processing sketch for the exercise.
- Run the Processing sketch. Use 1, 2, 3 keys to switch between 3 modes:
- A men faces selection
- A women faces selection
- The livestream from the webcam (if there is a webcam). Press spacebar to freeze the video-stream. It will facilitate the mapping of your static face.
- From now on, the Processing sketch will stream via Spout (Syphon) its output to every Spout (Syphon) receivers. We’ll use MAPIO Spout(Syphon) Built-in plugin to catch this video stream and map it onto our mannequin face.
- Open MAPIO.
- Windows users: Select Source -> Spout2 -> pmtest.
OSX users: Select Source -> Syphon -> Processing syphon
You should see the Processing sketch output into the Canvas area!
![2016-06-21 01_31_11-MAPIO 2 Lite (64 bits) [DEMO] - new](http://www.inimart.com/inimart/wp-content/uploads/2016-06-21-01_31_11-MAPIO-2-Lite-64-bits-DEMO-new-590x399.png)
Let’s map your face!
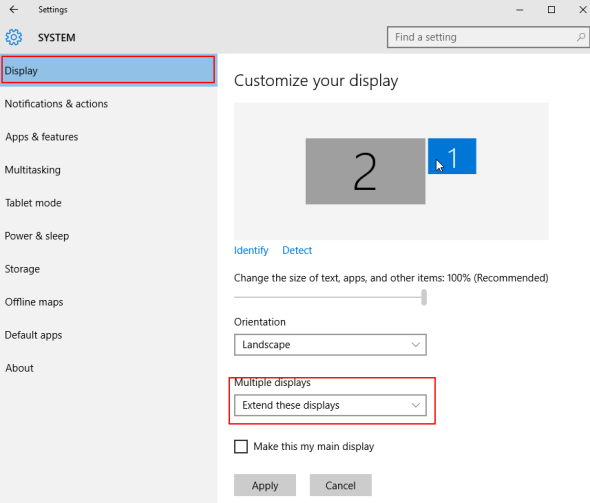
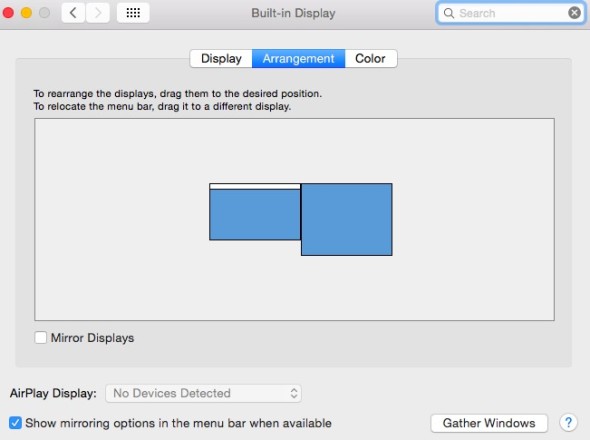
- If you have a projector, connect it to your PC/Mac now. The second video output of your PC/Mac will be connected to our projector.
Windows users: in your windows Settings, set the Display mode to Extend these displays.
OSX users: just open System Preferences -> Displays -> Arrangment, and make sure Mirror displays options is not checked.
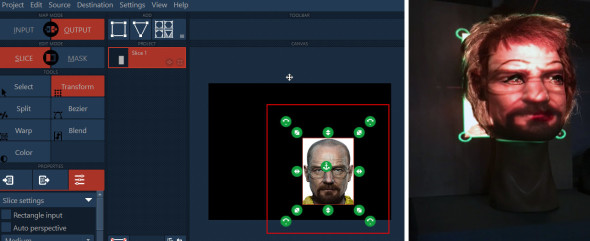
- Select INPUT in the Map Mode Tab (1), make sure SLICE Edit Mode is selected, and select the Transform tool from the Tools Tab (2). Now resize and move the selection around your favourite face (3).
![2016-06-21 01_35_34-MAPIO 2 Lite (64 bits) [DEMO] - new](http://www.inimart.com/inimart/wp-content/uploads/2016-06-21-01_35_34-MAPIO-2-Lite-64-bits-DEMO-new-590x384.png)
- In this way we are telling MAPIO that we are only interested in that area of the input signal.
- If you have a Projector, then continue to the next step. If you don’t, jump at the end of the tutorial to correctly setup MAPIO, then you will return to the step 6 of this tutorial!
- Switch to OUTPUT Map Mode (1), choose the Display option in the Destination Menu (2). A separate window will appear (3): this is the content we will project with our projector onto our mannequin. Drag the Display Window (3) to the second screen, and double click into it to switch in full screen mode. At this point you should see your MAPIO interface in the first screen, and a fullscreen face projected from your projector.
![2016-06-21 18_34_27-MAPIO 2 Lite (64 bits) [DEMO] - new](http://www.inimart.com/inimart/wp-content/uploads/2016-06-21-18_34_27-MAPIO-2-Lite-64-bits-DEMO-new-590x371.png)
- Resize the rectangle in the CANVAS tab and translate it in the canvas area: try to match the mannequin face area as close as possible (focus on the eyes and the mouth).
- Now the fun part. As you noticed, there are part of your projected image that have to be replaced, to match the mannequin shape. MAPIO allows you to warp the projected in more ways. Here you can find a comprehensive video with all the MAPIO warping features. In our tutorial, we’ll focus on the Elast Mode tool. To start with it, Select the Warp tool (1), make sure you select at least Medium subdivisions in your slice settings (2), and choose Elast Mode – Elast Rect in the Toolbar (3). You should see a red rectangle on your face. Now we need to modify the The Elast Rect area: every vertex we will move will affect all the vertices in this Elast Rect area. Let’s start with the eyes: as you notice from the projection, to fill the whole mannequin face we resized our projected face, but now the glasses are too wide, we need to shrink the area between the projected eyes, mantaining (as long as possible) the position of the ears. To move on the right the left side of the glasses without create a strong distortion on the near vertices, we can influence the whole left side of the projected image: click and drag with the left mouse button from the upper left (4) to the bottom right (5) of the left side of the image.
![2016-06-21 22_19_32-MAPIO 2 Lite (64 bits) [DEMO] - new](http://www.inimart.com/inimart/wp-content/uploads/2016-06-21-22_19_32-MAPIO-2-Lite-64-bits-DEMO-new-590x424.png)
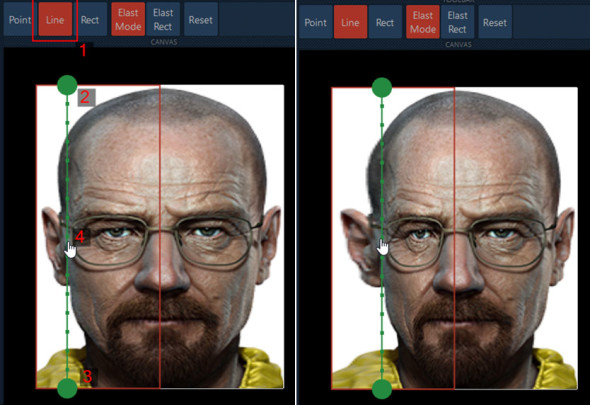
- Inside this area, we choose to push the glasses toward the center, starting from the left. Switch to the Line Tool (1), Click and drag from point (2) to point (3), and then click on the line you just created, and drag it to the right, until the left lens glasses will be centered on the left mannequin eye. Please note that in this tutorial we will focus on the eyes, the nose and the mouth, so we don’t care if the rest of the projected face will be distorted: we will mask it at the end 🙂
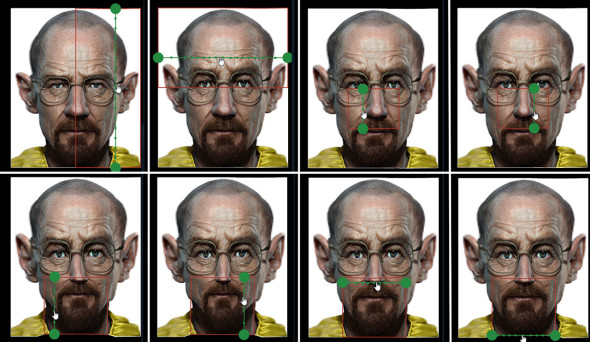
- Repeat the process for the right eye, the nose, and the mouth. Remember: each time you are moving a different area, you have to specify a different Elast Rect area.
- For the nose, use two vertical lines to adjust the left side and the right side, while mantaining the same Elast Rect area.
- For the mouth, use two vertical lines to adjust the left side and the right side, and two horizontal lines to adjust the beginning and the end of the beard, while mantaining the same Elast Rect area.
- And here it is our result for now:

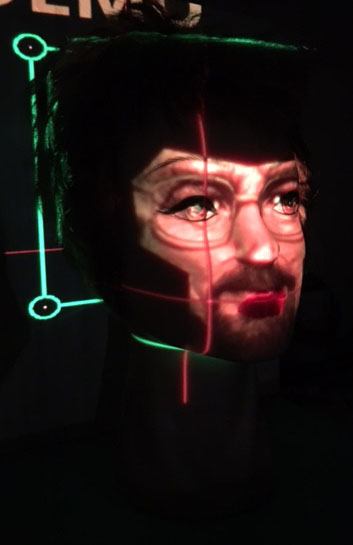
We can turn off the areas outside the center, in this way we will also cut off the high projected distortion on the forehead, the ears and the cheeks. Le’s mask them! - Click on Mask Mode (1), choose Vector Tool (2) and then click on the (+) Toolbar icon (3). Left click a few times to create a polyline around eyes, nose and mouth (4-13), double click to close the path (14), then click on Invert in the Mask properties (15).
![2016-06-21 22_55_35-MAPIO 2 Lite (64 bits) [DEMO] - new](http://www.inimart.com/inimart/wp-content/uploads/2016-06-21-22_55_35-MAPIO-2-Lite-64-bits-DEMO-new-590x549.png)
We obtain this:
- This is only a tutorial: in a real project we probably will mask the projected image with an alpha image and smoothed borders, to better merge our projected face with the mannequin one, and we will use a lot of other tricks to get a better result. Keeping things simple, we can still adjust a bit the projection. Since the mannequin has its own colour (pink), it is best to desaturate our projected image. Click on Color Tool, and set the Saturation value to 0.
![2016-06-21 23_09_05-MAPIO 2 Lite (64 bits) [DEMO] - new](http://www.inimart.com/inimart/wp-content/uploads/2016-06-21-23_09_05-MAPIO-2-Lite-64-bits-DEMO-new-590x273.png)
- If you are simulating the projector, probably at this time you already get a good result. If you are using a real projector, probably you want to light up a bit the rest of the mannequin face. To do that, we can add a white background surface to the projection. Click on the Square icon in the Add Tab: a “Slide 2” rectangle will appear in the Project Tab. Drag it under the “Slice 1” rectangle.
![2016-06-21 23_10_16-MAPIO 2 Lite (64 bits) [DEMO] - new](http://www.inimart.com/inimart/wp-content/uploads/2016-06-21-23_10_16-MAPIO-2-Lite-64-bits-DEMO-new.png)
- Choose Source->Image and select a white image from your disk.
![2016-06-21 23_12_15-MAPIO 2 Lite (64 bits) [DEMO] - new](http://www.inimart.com/inimart/wp-content/uploads/2016-06-21-23_12_15-MAPIO-2-Lite-64-bits-DEMO-new.png)
- Click on Color Tool (like in step 11) and adjust the Brightness until you get a good uniform (almost) result between the projected face and the projected backgroud. On the right you can see the simulated-projection result (using the Processing sketch).
…Enjoy your result!:)
Let’s map your face (without a projector)!
Ok, so.. it turns out that your projector is broken, you lent it to your best friend a year ago, or.. you simply don’t have one, but you want to start practice with the projection mapping tools. We can simulate the projector output using for the second time the Spout (Syphon) framework, this time as a destination.
- Windows users: select Destination -> Spout2 from the Menu
OSX users: select Destination -> Syphon from the Menu
![2016-06-21 23_56_05-MAPIO 2 Lite (64 bits) [DEMO] - projector_00.mio [ ~_Documents_Projects_Projecti](http://www.inimart.com/inimart/wp-content/uploads/2016-06-21-23_56_05-MAPIO-2-Lite-64-bits-DEMO-projector_00.mio-_Documents_Projects_Projecti.png)
- Select Destination -> Output settings, click on 640×480 resolution link, and click Save.
![2016-06-22 00_17_50-MAPIO 2 Lite (64 bits) [DEMO] - projector_00.mio [ ~_Documents_Projects_Projecti](http://www.inimart.com/inimart/wp-content/uploads/2016-06-22-00_17_50-MAPIO-2-Lite-64-bits-DEMO-projector_00.mio-_Documents_Projects_Projecti.png)
- Download here the processing receiver sketch (WIN / OSX), open and run it.
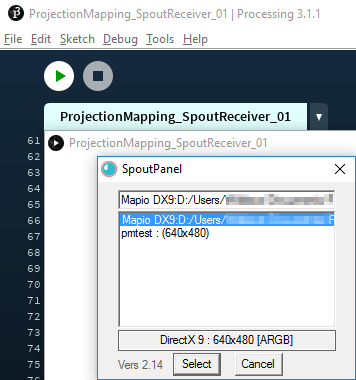
- Windows users: right click on the Processing output window: it will appear a menu with all the Spout senders. pmtest is our Processing sketch sender, that we are using to stream the Processing output to MAPIO. Here we need to get the MAPIO output, so choose Mapio as Spout source. Click Save.
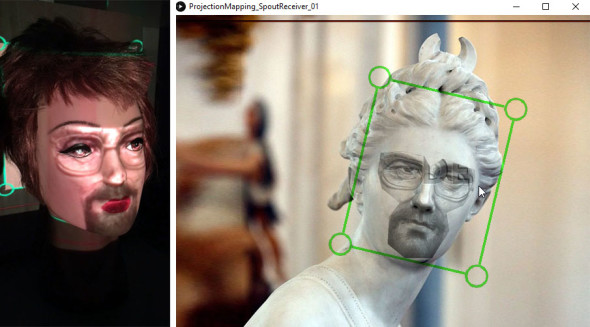
- Use the keys 1,2,3,4 to choose the best background onto wich you want to project your face. This background images will let you to simulate a real situation, but since you don’t have a real projector, let’s simulate a projection adding the MAPIO output to our fake background statues. You should see something like this:
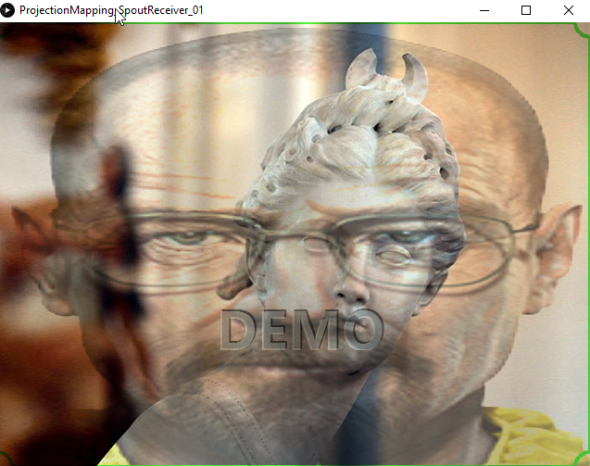
Our projected face is clearly too big for the background statue face, but we will adjust it soon. Now jump back to the previous tutorial steps, to number 6. Remember that every time you will see a projected image onto the mannequin face you have to imagine that face projected onto the background statue of the Processing Sketch. I know, it is not the same, but.. it is still something! Enjoy!