
In the previous tutorial, we installed antilatency software to test the tracker for a Desktop app. In this tutorial, we’ll setup a Unity project for the OculusGo, and use AntilatencySDK to test 6DOF on our OculusGo HDM. Let’s start!
Unity project setup
We already downloaded Unity with its Android Build Support.
- Switch Build Platform to Android in Build settings panel:

- Go to the AssetStore and download and import OculusIntegration. It’s free, and it is a collection of modules and scripts that allow a better integration with Oculus SDK inside Unity. This asset store module is mandatory, if you want to use Antilatency VR sample project without problems.

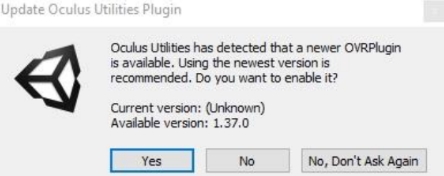
- Sometimes (depending on your Unity version) the last step could cause a Unity crash. Don’t worry: restart Unity Hub and reopen the project. If at start a newer version of the plugin is detected, click Yes to update, then Restart again.

- Now its time to setup project settings for your OculusGo. If you want to develop for VR, you have to take into account a lot of performance issues that could arise, and to know which settings are appropriate for the project, a very good start is to read this post in the official Oculus developer blog. Follow the entire post suggestions, with only one exception: I suggest you to leave the ScriptingBackend option to Mono, to avoid long build times.
- Install ADB. Android Debug Bridge is the main tool used to communicate with an Andorid device for debugging. Download platform-tools_r29.0.1-windows.zip from the Android developer website, and unzip the file content in C:\ADB (this directory path is not mandatory, it is only a suggestion). To test it, from command prompt, write: C:\ADB\adb help, and it should reply with the adb help info.

- Install ADB OculusGo Driver. Download oculus-go-adb-driver-2.0.zip from the Oculus developer website, unzip the file, right-click on the .inf file and select install.
- Set your OculusGo to Developer mode. Go to the Oculus App on your mobile phone and click on your OculusGo. Then click Settings and DeveloperMode: switch it to On.
- Using adb from the command prompt, it is possible to connect and communicate with an Android device. Connect your OculusGo via USB to your PC.
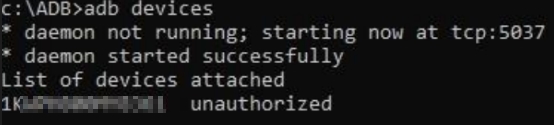
- From the command prompt, type: adb devices. If it is the first time you run this command, adb should advice you that your OculusGo is connected to your PC, but it is unauthorized. Something like this:
If your device is not listed:- you don’t have the correct USB driver
- try another USB cable and/or USB port
- You have to trust your PC from within your OculusGo. Put your headset on. You should see something like:

- Click Allow and then Ok
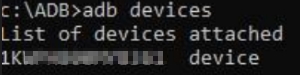
- Now back to the Command prompt: type adb devices again. Now you should see device instead of unauthorized along your device ID
- So far so good. Now you are able to install Android builds on your OculusGo. Every time you have to install an .apk build into your Oculus, you should:
- Connect your OculusGo to the PC
- type adb devices and check that it is connected
- type adb install -r C:\<pathToYourApkFile>\ApkFileName.apk (we use the -r option because if you need to reinstall it again, this option will overwrite the existing one)
Antilatency VR project import
- Go to your downloaded AntilatencySDK folder: in the previous tutorial we already imported AntilatencyIntegration.unitypackage in our Unity project. If you didn’t, do it now. Moreover, we need to import AntilatencyIntegrationOculusExtension.unitypackage.
- Once you imported both unitypackages, you’re almost ready to go!
- Open Assets/Antilatency/Integration.Oculus/Samples/AltOculusSample and build the project, including only this scene. Save the .apk file into a /Build folder outside the Asset folder. Name it AltOculusSample.apk, for example.
- At the end of the process, you should have your apk in the folder C:\<pathToYourApkFile>\AltOculusSample.apk
- You should already have your OculusGo connected to your PC; if not, connect it now (see the previous section on how to do this)
- From your command prompt, type adb install -r C:\<pathToYourApkFile>\AltOculusSample.apk. If everything is ok, the command prompt should reply with Success: your apk is now loaded and installed into your OculusGo!
OculusGo and Antilatency tracker setup
In order to connect your Antilatency Tracker with your OculusGo, you need a microUSB/microUSB cable (see part one of this tutorial for the Amazon link), and attach the tracker in the bootm center of your HDM:

Start the Antilatency apk
- Put your OculusGo on.
- From your dashboard, go to Unknown sources: you should see your apk listed. Click on it and.. you’re ready to experiment 6DOF with your OculusGo!
Here it is a final test: you can see the OculusGo moving on the floor (even outside the floor, if you look back to the floor) and the live recording of the scene.
![]()